Sunday, December 30, 2012

Confetti Cupcakes


Yes, I know....I disappeared again!  I spent the last three weeks of December baking for clients but had no time to do any photographing or blogging.  Right now I'm working on baking my New Years Eve specials.  For this holiday I offered Snowball Cupcakes (aka my Coconut Cupcakes) and Confetti Cupcakes.  I thought these were perfect desserts to offer for winter time celebrating!


I really wanted to offer a champagne cupcake but I still haven't had success with those, gotta keep working on creating the perfect champagne cupcake....maybe by NYE next year!


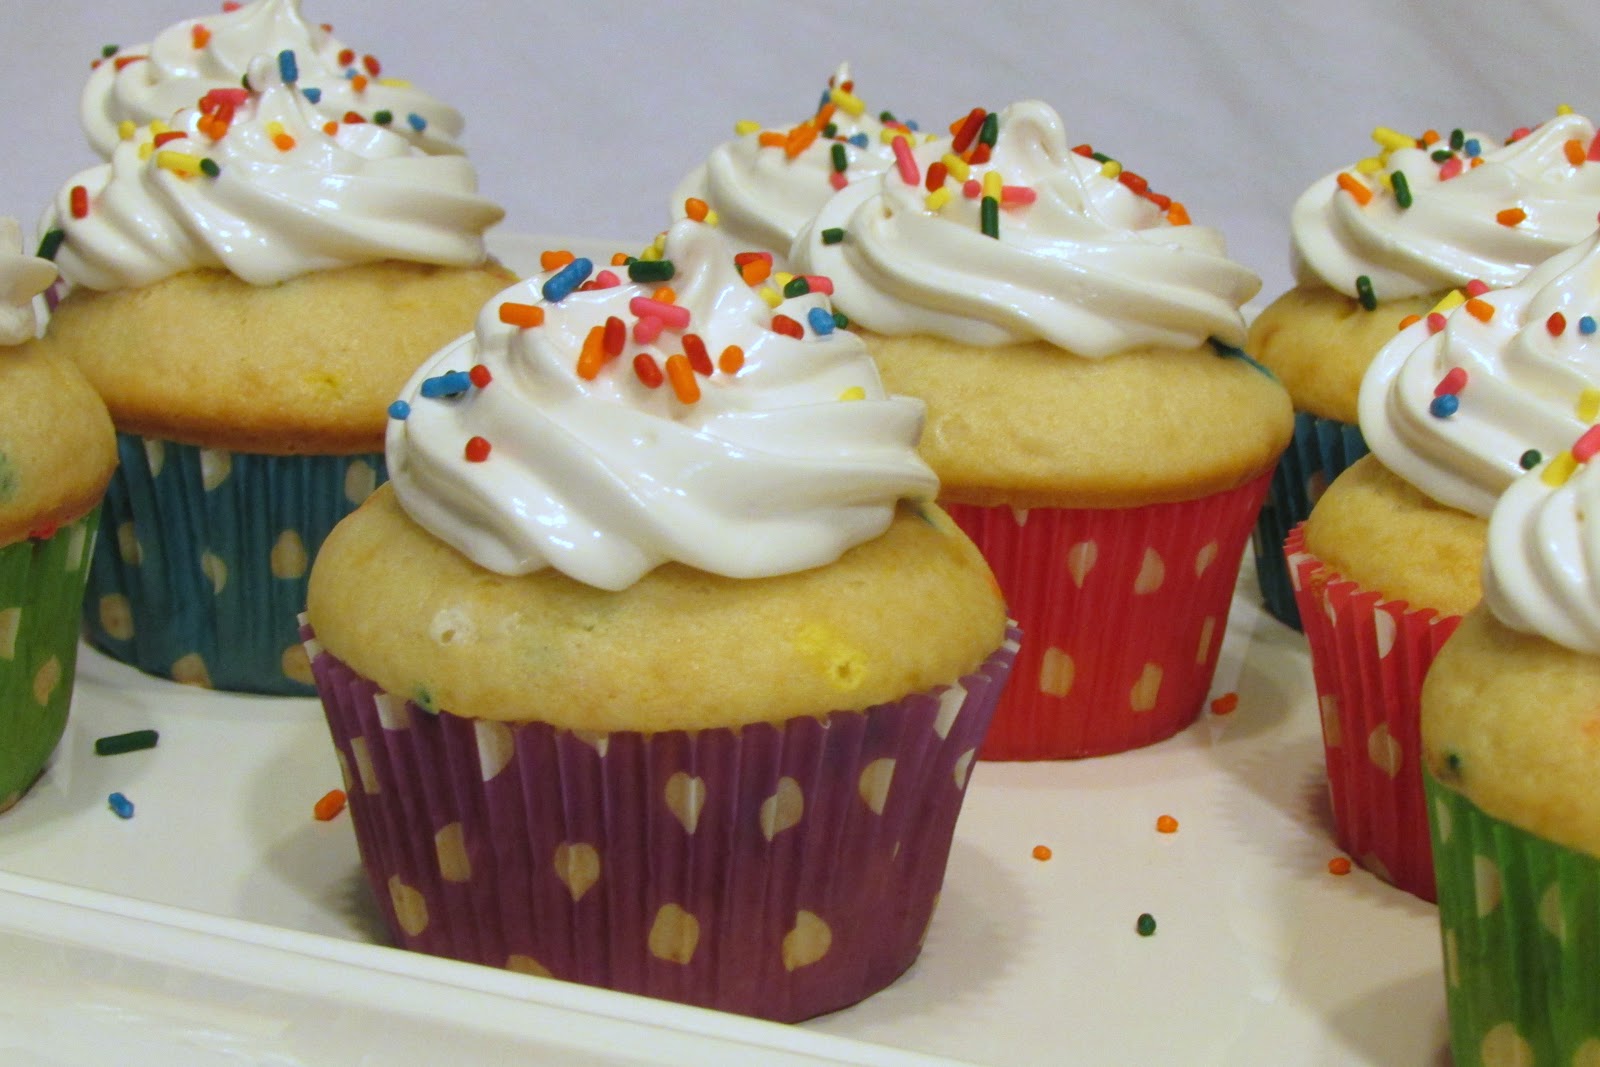
I have never actually had a "Funfetti" cupcake from the box but I have seen people serve them over the years and they look like a celebration cupcake to me.  I thought they would be so much fun to make from scratch and the perfect cupcake to offer for NYE (or a Birthday, for that matter).  I LOVE when people start tossing out the confetti at midnight on New Years.  I love to see the sky littered with colors, raining down over everyone.  That is what I hoped to capture with these cupcakes!


I bought several different colors of jimmies (the best candies to use for these cupcakes because they melt best) and mixed them myself.  I wanted all of the bright, happy colors!  Then I made a vanilla white cupcake batter and mixed them in.  


I probably could have added more jimmies to the mix, but I like that there's not too many.  I want to be able to taste all of that yummy vanilla bean and have the colorful jimmies just be there for the added color.


Most of the time people frost their Confetti Cupcakes with a vanilla buttercream but I am in love with my Seven Minute Frosting recipe and I think it is soooooo good on ANY cupcake.  Besides, who doesn't LOVE that marshmallow flavor laced with vanilla?  Plus, it's super light and fluffy and we have had enough heavy, rich foods to last us a few months!


I don't want to toot my own horn....but......"TOOT TOOT"!!!  I think these cupcakes are sooooo cute!  Plus....they are delicious!  My boys loved them and so did my clients!


Make these cupcakes, pop the cork on the champagne bottle and let's celebrate!
HAPPY NEW YEAR!!!

Confetti Cupcakes
makes 12 cupcakes

1 1/4 cups all purpose flour
1 1/2 tsp baking powder
1/4 tsp salt
3/4 cup sugar
6 tbsp butter, room temperature
1 large egg + 1 egg white, room temperature
1 tsp vanilla extract or 1/2 teaspoon vanilla bean paste (my preference)
1/2 cup milk
2 tbsp rainbow sprinkles + more to decorate the top of the cupcake after frosting

Preheat oven to 350F and line cupcake pan with paper liners.

In a large bowl, sift flour, baking powder and salt. Set aside. In a mixer, beat the sugar and butter until well combined, about 2-3 minutes. Add egg and egg white, one at a time, beating on low.  Add vanilla. Gradually add flour mixture in 3 additions, alternating with milk in 2 additions, ending with the flour mixture. Fold in 2 tablespoons rainbow sprinkles.

Fill cupcake liners about 2/3 full. Bake for about 15-18 minutes or until a toothpick inserted in the middle comes out clean. Remove from pan and cool completely on a wire cooling rack before frosting.  Pipe or spoon Seven Minute Frosting onto each cupcake and decorate with remaining sprinkles.

Seven Minute Frosting
makes enough frosting for 3 dozen cupcakes

1 ½ cups sugar
¼ teaspoon cream of tartar
1/8 teaspoon salt
1/3 cup water
2 egg whites
1 ½ teaspoons vanilla extract

Place all ingredients, except vanilla, in top of a double boiler.  Place pan over boiling water, being sure that boiling water does not touch the bottom of the top pan.  Beat constantly on high speed with electric mixer for 7 minutes.  Remove from heat and beat in vanilla.

Recipe shared on:
My Turn For Us - Freedom Friday's
Adorned From Above - Wednesday Blog Hop
Chocolate, Chocolate, and more - Thursday's Treasures
Foodie Friends Friday


Wednesday, December 12, 2012

Happy Blogiversary To Me!!! (Oh...and Jamoca Almond Fudge Cupcakes)


One year ago today my blog was born!  The blog was an idea I had played around with for a while and one final push from my niece Samantha got me going.  She was the one who encouraged me to go to blogspot.com and get this blog started!  I did it and I am so happy that I did.  This is a place where I can be creative and express myself.  I absolutely love baking, I always have and I am thrilled to be able to share this love with people!

Thanks to all of you who support me and encourage me and read my posts and make my recipes. A big thanks to my kids and my Mom and all of my friends who act as taste testers for my creations!  I am still amazed and thrilled that so many people follow me!  In one short year I have over 92 who subscribe via Google, 87 who subscribe via email and I just passed 300 "likes" on Facebook!  Not too bad for someone who squeezes blogging into an insanely busy schedule!

This being my blogiversary and my 85th published post, I thought it should be a special one!  Cupcakes seem to be my most popular posts so I created a special cupcake just for me!


When I was in college, I worked for a Doctors billing office.  My sister managed the office and there was a great group of people working there, including my Mom!  We had a blast!!  Lots of potlucks and office parties and for every Birthday, we would get a Baskin Robbins Ice Cream Cake.  My favorite flavor was Jamoca Almond Fudge Ice Cream Cake!  I Love the coffee ice cream with chocolate fudge ribbons running through it and toasted almonds.  So yummy!  These are the flavors I decided to use to create my special cupcake!  A chocolate fudge cupcake with coffee swiss meringue buttercream, fudge sauce drizzled over the top and a sprinkling of sliced almonds!

What a way to celebrate!  The taste of these cupcakes takes me back to all of those office parties and that yummy Baskin Robbins Ice Cream!

Thanks again for sharing this journey with me and for reading my blog!  I hope that you enjoy it as much as I do!

~ Becky ~

Jamoca Almond Fudge Cupcakes


Cupcake adapted from Alice Medrich
2 cup all purpose flour
2 cup plus 4 tablespoons sugar
2/3 cup plus 4 tablespoons unsweetened Cocoa Powder
1 teaspoon baking soda
1/2 teaspoon salt
1 cup unsalted butter, melted and warm
4 large eggs
2 teaspoon pure vanilla extract
1 cup hot coffee

Line cupcake pan with paper liners and preheat the oven to 350 degrees.

In a large mixing bowl, mix the flour, cocoa powder, sugar, baking soda, and salt together thoroughly. Add the butter, eggs, and vanilla and beat on medium speed for one minute. Add half of the water and beat for 20 seconds. Scrape the sides of the bowl and add the remaining water. Beat for 20-30 seconds until the batter is smooth. The batter will be thin enough to pour.

Divide it evenly among the lined cups. Bake 16- 18 minutes (rotating the pan from front to back half-way through the baking time), just until a toothpick inserted into a few of the cupcakes comes out clean. Set the pan on a rack to cool for ten minutes. Transfer the cupcakes from the pan to the rack and let them cool completely before frosting or filling.  Makes 24 cupcakes.

Coffee Swiss Meringue Buttercream

5 large egg whites
1 1/2 cup sugar
4 sticks butter, diced and softened
1/4 teaspoon salt
1 tablespoon vanilla
2 tablespoons instant espresso powder disolved in 2 tablespoons boiling water

Combine egg whites and sugar in a bowl placed over simmering water. Bring mixture to 150 degrees F (or until sugar is completely disolved) while whisking constantly.

Transfer mixture to stand mixer bowl, fitted with a whisk attachment and beat on medium speed until mixture cools and doubles in volume.

Add butter in one piece at a time, mixing to incorporate after each addition. The mixture may appear clumpy and almost curdled looking-this is normal. Keep mixing and it will become even and smooth again. Add salt and vanilla and mix to combine. Add espresso mixture and mix to incorporate.

Assemble Cupcakes
1/4 cup Hot Fudge Sauce, heated to pouring temperature (then cooled to room temperature)
1/4 cup toasted almond slices

Pipe buttercream frosting on cupcakes.  Place hot fudge sauce into a piping bag or ziplock sandwich bag, cut  off the tip and drizzle over each cupcake.  Sprinkle with toasted almond slices and EAT!

Enjoy!

Recipe shared on:
Adorned From Above - Wednesday Blog Hop
21st Century Housewife - Hearth and Soul Hop
Chocolate, Chocolate, and More - Thursday's Treasures
Foodie Friends Friday

Tuesday, December 11, 2012

Peppermint Cupcakes


Happy Monday!  Let's start this post by saying that my Chocolate Thumbprint Cookies are being featured on Foodie Friends Daily Dish!  Yay me!!  :)  Head on over and check out all of the wonderful cookie recipes!

Now on to these fabulous cupcakes!  This weekend was filled with TONS of baking!  The kind of baking weekend when you think "chocolate, please don't ever let me see chocolate again....or flour or butter".  Wait a minute....I can't live without butter, so scratch the end of that comment!  But I did bake a lot and will be doing a lot more this week.  


The highlight of my baking weekend.....Peppermint Cupcakes!  A rich chocolate cupcake topped with peppermint cream cheese frosting!  Trust me....the frosting was fabulous!  Cream Cheese frosting is one of my favorites so I had to see if it would pair well with the peppermint and luckily it was perfect!!!


Next time I make these, I might even put a little of the extract right into the cupcake batter and give it an extra kick!  The cupcakes can be made and frosted in advance.  Refrigerate any leftovers.  My tip for you is this....do not add the crushed candy canes too early, the candy canes will melt into the frosting after a few hours.  


Big shout out of thanks to my friend's daughter, Nina, who photographed my cupcakes this weekend! She has her own photography blog called Nina Ten Eleven - See The World Through My Eyes.  Click on the name to link to her blog and check it out! 


Somebody was getting herself into the holiday spirit!  My own little reindeer named Cocoa!  :)

Peppermint Cupcakes

Cupcake via Alice Medrich
1 cup all purpose flour
1 cup plus 2 tablespoons sugar
1/3 cup plus 2 tablespoons unsweetened Cocoa Powder
1/2 teaspoon baking soda
1/4 teaspoon salt
1/2 cup (1 stick or 4 ounces) unsalted butter, melted and warm
2 large eggs
1 teaspoon pure vanilla extract
1/2 cup hot water

Line cupcake pan with paper liners and preheat the oven to 350 degrees.

In a large mixing bowl, mix the flour, cocoa powder, sugar, baking soda, and salt together thoroughly. Add the butter, eggs, and vanilla and beat on medium speed for one minute. Add half of the water and beat for 20 seconds. Scrape the sides of the bowl and add the remaining water. Beat for 20-30 seconds until the batter is smooth. The batter will be thin enough to pour. 

Divide it evenly among the lined cups. Bake 16- 18 minutes (rotating the pan from front to back half-way through the baking time), just until a toothpick inserted into a few of the cupcakes comes out clean. Set the pan on a rack to cool for ten minutes. Transfer the cupcakes from the pan to the rack and let them cool completely before frosting or filling.  Makes twelve cupcakes

Frosting
1/2 C. butter, softened
8 oz. cream cheese 
1 1/2 tsp. peppermint extract
4 C. powdered sugar

Beat butter and cream cheese until smooth. add peppermint extract and slowly add powdered sugar until you reach your desired consistency.

Pipe or spread desired amount onto cupcakes.  Sprinkle with crushed candy canes if desired.

Recipe makes enough frosting for 24 cupcakes so you will have to double that cupcake recipe or get your spoon ready to eat the left over frosting!! :)

Tuesday, December 4, 2012

Chocolate Caramel Thumbprint Cookies


Even though I am famous for my cupcakes....cookies are really my favorite.  I love them all.  Chocolate chip, oatmeal, sugar cookies, snickerdoodles......ALL of them!  It's funny that I am so experimental with cupcakes but more of a purist with cookies, so I figured it was time for me to branch out and make a cookie with a little more oompf!  This recipe comes straight to you from Better Homes and Gardens.  I followed it exactly as written for this post.


The cookie base is very chocolatey, I used Dutch process cocoa which made for a deeper, richer chocolate flavor.  Very much like a brownie!  The cookie dough is rolled into balls, dipped in egg white and rolled in the chopped pecans.  At this point a normal person would use their thumb to make the thumbprint in the cookie, but I'm not normal!  Plus, we all know I have dozens of wine corks laying around!  So if you don't want to use your thumb, you can use a wine cork, or the back of a measuring spoon, to make the indention in the cookies.


The baked cookies are filled with gooey caramel filling!  My tip to you would be to melt your caramels in cream and leave the pan on the stove with the burner turned off.  This will help keep the caramel pourable so that you don't have to keep re-heating it after each batch is baked.


I finished off my cookies by drizzling melted chocolate over the top!  So pretty and so yummy!

Chocolate Caramel Thumbprint Cookies via Better Homes and Garden
Makes 36 cookies

1 egg
1/2 cup butter, softened
2/3 cup sugar
2 tablespoons milk
1 teaspoon vanilla
1 cup all-purpose flour
1/3 cup unsweetened cocoa powder
1/4 teaspoon salt
16 vanilla caramels, unwrapped
3 tablespoons whipping cream
1 1/4 cups finely chopped pecans
1/2 cup semisweet chocolate pieces
1 teaspoon shortening

Separate egg; place yolk and white in separate bowls. Cover and chill egg white until needed. In a large mixing bowl beat butter with an electric mixer for 30 seconds. Add sugar and beat well. Beat in egg yolk, milk, and vanilla.

In another bowl stir together the flour, cocoa powder, and salt. Add flour mixture to butter mixture and beat until well combined. Wrap the cookie dough in plastic wrap and chill for 2 hours or until easy to handle.

Preheat oven to 350 degrees F. Line cookie sheet with parchment paper. In a small saucepan heat and stir caramels and whipping cream over low heat until mixture is smooth. Set aside.

Slightly beat reserved egg white. Shape the dough into 1-inch balls. Roll the balls in egg white, then roll in the chopped pecans.  Place on cookie sheet and using your thumb (or a wine cork), make an indentation in the center of each cookie.

Bake for 10 minutes or until edges are firm. If cookie centers puff during baking, repress with your thumb. Spoon melted caramel mixture into indentations of cookies. Transfer cookies to wire racks; cool. (If necessary, reheat caramel mixture to keep it spoonable.)

In another saucepan heat and stir chocolate pieces and shortening over low heat until chocolate is melted and mixture is smooth. Let cool slightly. Drizzle chocolate mixture over tops of cookies. Let stand until chocolate is set.

Tuesday, November 20, 2012

Maple Pumpkin Pie with Streusel


This year I am not making Thanksgiving dinner.  I know....(gasps loudly)!  I am having a wonderful and exciting and special Thanksgiving with my Mom.  We are dressing up and heading to San Francisco for a wonderful dinner in a beautiful hotel!  Super excited!

Even though I'm not cooking, I am still in baking mode!  I have put out an offering for all of my clients to purchase for their very own special Thanksgiving dinners.  My first offering is a beautiful freeform apple pie or galette.  You know it on my blog as "Apple Crunch Pie".  I am also offering this delicious Maple Pumpkin Pie with Streusel!  So excited!  This pie is beautiful AND delicious with a hint of maple in the pie and a fabulous streusel on top.  

Hope you and your families are enjoying this holiday together and that your day is filled with yummy food and a lot of love!

Happy Thanksgiving!

Maple Pumpkin Pie with Streusel  adapted from Sunset Magazine

Crust:
6 tablespoons very cold unsalted butter, cut into 1/2 inch pieces
1 1/2 cups all-purpose flour
1/2 teaspoon kosher salt
1/2 tablespoon sugar
5 tablespoons very cold vegetable shortening
3-4 tablespoons ice water

Place the flour, salt, and sugar in the bowl of a food processor fitted with a steel blade and pulse a few times to mix. Add the butter and shortening. Pulse 8 to 12 times, until the butter is the size of peas. With the machine running, pour the ice water down the feed tube and pulse the machine until the dough begins to form a ball. Dump out on a floured board and roll into a ball. Wrap in plastic wrap and refrigerate for 30 minutes.

Roll dough on a well-floured board into a circle, rolling from the center to the edge, turning and flouring the dough to make sure it doesn't stick to the board. Fold the dough in half, place in a pie pan and return to the refrigerator until filling is ready.

Maple Pumpkin Filling:
1/4 cup granulated sugar 
1/4 cup firmly packed dark brown sugar 
3T - 1/4 cup maple syrup (depending on how sweet you like it)
1 tablespoon all-purpose flour 
1 1/2 teaspoons ground cinnamon
1/4 teaspoon ground nutmeg
1/2 teaspoon salt
1/4 teaspoon ground ginger
1 can (15 oz.) pumpkin 
1 can (12 oz.) evaporated milk 
2 large eggs, beaten to blend 

Preheat oven to 375°. In a bowl, mix granulated sugar, brown sugar, maple syrup, flour, cinnamon, nutmeg, salt, and ginger. Add pumpkin, milk, and eggs; whisk until well blended.

Pour mixture into unbaked 9-inch pie pastry in pan.  Bake for 25 minutes, then sprinkle walnut streusel evenly over filling. and return to oven.  Bake for an additional 45 minutes or until knife inserted in center comes out clean.

Set on a rack until cool to touch, about 2 hours, chill until ready to serve

Walnut Streusel:
1/4 cup firmly packed light or dark brown sugar
1/4 cup rolled oats
1/4 cup chopped walnuts
1/4 cup all-purpose flour 
1/2 teaspoon ground cinnamon
1/8 teaspoon ground nutmeg
1/4 cup butter, cut into cubes

In a bowl, combine all ingredients and cut butter into mix, using pastry cutter until crumbly.


This recipe is shared on:


Monday, November 19, 2012

Brownie Cookies with Caramel Creme Filling


Everyone deals with stress differently.  Some people eat, some people drink, some people go shopping, some people hide away listening to music.....I bake!  Sometimes I go crazy and clean the house and sometimes I want to sit in my jammies and eat all day but baking is the thing that helps me the most.  I don't necessarily want to eat if after I've baked it, I just need to do it for the therapy.  It's pretty cheap therapy, actually! 


Last week was not my best week.  I got some very stressful news and I am not sure how I will fix things.  I know everything will be fine, but right now I am overwhelmed.  So to help me cope, I've been baking.  Ok, ok, ok.....I've been baking AND drinking red wine.  If it makes it any better, I've been baking a lot more than I've been drinking wine.....honest!


During one of my Pinterest drooling sessions, I found these cookies made by Naomi at Baker's Royale.  I LOVE her blog and all of her over-the-top desserts!  Anyways, when you are upset you really need chocolate.  Well, YOU really need chocolate....I need caramel (and red wine, but I think we've covered that).  This recipe sort of combines the best of both worlds.  The original recipe came from Donna Hay who filled her cookies with a peanut butter frosting. Sounds yummy but I followed Naomi's lead and made this fabulous caramel creme filling using my homemade caramel (from my Vanilla Bean Cupcakes with Caramel Filling).  You can use store bought if you  prefer, it will still taste fabulous!


Don't wait until you've had a bad day to try this recipe.  In fact, make these babies and maybe you won't have a bad day! 

Enjoy!

Brownie Cookies with Caramel Creme Filling via Bakers Royale
Makes 24 cookie sandwiches

Brownie Cookie:
12 oz. chocolate, chopped
3 tablespoons butter
2 eggs
⅔ cup sugar
1 teaspoon vanilla extract
¼ cup all-purpose flour
¼ teaspoon baking powder

Preheat oven to 350 degrees.  Place 7oz. of the chocolate and the butter in a saucepan over low heat and gently stir until melted and smooth. Set aside.

Place the eggs, sugar and vanilla in the bowl of a stand mixer fitted with a paddle attachment and beat for 15 minutes or until pale and creamy. Add in flour, baking powder, melted chocolate mixture, remaining 5 oz. of chocolate and mix to combine. Set aside to to stand for 10 minutes. 

Spoon 2 tablespoonful of the mixture, onto parchment lined bake sheet. Bake for about 8–10 minutes or until puffed and cracked. Allow to cool completely on trays.


Caramel Creme Filling:
1 cup butter
2 cups confectioner sugar
1/3 cup caramel

Place butter in a bowl and beat until creamed. Add in confectioner sugar and beat until light combined. Add in caramel and beat until combined.

Assemble:

Spread a teaspoon and a half of caramel creme on underside of one brownie cookie and place a second brownie cookie bottom side down on top frosting

Recipe Shared on:


Monday, November 5, 2012

Magic Bars


That's right....you heard me....Magic Bars!  


These bars have many names - Magic Bars, Seven Layer Bars, Hello Dolly Bars, the list goes on!  Call them whatever you like as long as remember two things; 1. these bars are INCREDIBLY addictive 2. they are NOT low fat or low sugar!


I love these bars for so many reasons.  They are delicious and dreamy and everyone loves them!  They are easy to make, easy to cut, and easy to travel with!  But the reason I love them the most is that they are whatever you would like them to be!  You can add any flavor of chocolate chips or even butterscotch chips, any variety of nuts you like, coconut, toffee, peanut butter, etc. etc. etc.


The first layer is graham cracker crumbs and butter but could easily be changed to ground ginger snaps or chocolate cookies.  The layer of sweetened condensed milk can be altered by adding other flavors to it such as caramel, chocolate sauce, or pumpkin.  I used a mixture of semi-sweet and white chocolate chips and used macadamia nuts but other times I have added butterscotch chips and pecans.  All variations equally delicious!


This is the magic of these bars, they can become anything you want them to.  Ok, they won't make you skinny or bring Tyler Florence knocking on your door, but they are still magical!  Make them soon and find out for yourself!  :)


Magic Bars via Eagle Brand


1 1/2 cups graham cracker crumbs
1/2 cup butter, melted
1 (14 oz.) can Eagle Brand® Sweetened Condensed Milk
1 cup semi-sweet chocolate chips
1 cup white chocolate chips
1 1/3 cups flaked coconut
1 cup chopped macadamia nuts


Heat oven to 350°F. Coat 13 x 9-inch baking pan with no-stick cooking spray.

Combine graham cracker crumbs and butter in small bowl. Press into bottom of prepared pan. Pour sweetened condensed milk evenly over crumb mixture. Layer evenly with chocolate chips, coconut and nuts. Press down firmly with fork.

Bake 25 to 30 minutes or until lightly browned. Loosen from sides of pan while still warm; cool on wire rack. Cut into bars or diamonds.

For perfectly cut cookie bars, line entire pan with foil, extending foil over edge of pan. Coat lightly with no-stick cooking spray. After bars have baked and cooled, lift up with edges of foil to remove from pan. Cut into bars.


This recipe shared on:
My Turn For Us Linky Party - Freedom Fridays
Chocolate, Chocolate, and more Chocolate - Thursdays Treasures
The 21st Century Housewife - Hearth and Soul Blog Hop

Wednesday, October 31, 2012

Malfatti - Delicious Dumplings From Heaven


Malfatti, when translated from Italian, means "poorly made".  I have no idea how anyone could call these delicate, light, fluffy and delicious dumplings "poorly made".  They are like little bites of heaven to me!  Malfatti are really a Tuscan version of Gnocchi, that are made with flour, ricotta, and spinach (or kale, swiss chard, etc.).


I was recently told about these heavenly dumplings from a friend who had seen the recipe in Saveur Magazine.  I looked them up online and saw that they mixed ricotta cheese with swiss chard and a small amount of flour for what turns into incredibly light pillows of goodness that they serve with a Sage and Browned Butter Sauce.

How could I resist!  I had just been to the farmers market and had close to 2 lbs of kale at home just begging for a new recipe.  Saveur used 4 lbs of swiss chard and the picture of their Malfatti is of an extremely dark dumpling.  I decided to try it with my 2 lbs of kale.  Perfect flavor, the kale was not overpowering but rather light and added a nice green color to the dumpling.


Now, this is a simple recipe and didn't take too long but I will warn you to keep flour on hand to shape your malfatti.  I ended up using two spoons to shape them and dumping the newly formed malfatti onto a plate of flour and rolling the dumpling in that before placing on a cookie sheet.  This kept them from sticking to the cookie sheet or my hands.


The sauce is simple but delicious.  You could serve these with a marinara sauce as well but I really enjoyed the simple flavors of the browned butter sauce with the crispy sage leaves.  My mouth is drooling just thinking about it!  :)

Malfatti via Saveur


1 lb. ricotta
1 tsp. kosher sal
approx 2 lbs Kale (can use spinach or swiss chard)
16 tbsp unsalted butter, melted
1/4 cup flour, plus more for shaping
1/2 tsp. freshly grated nutmeg
4 egg yolks
1 egg
Freshly ground black pepper, to taste
24 sage leaves
Freshly grated Parmesan cheese, for serving

Put ricotta in a cheesecloth-lined strainer set over a bowl and let drain overnight in refrigerator.

Bring a large pot of salted water to a boil and add kale; cook until soft, 3–4 minutes. Drain kale and let cool. Squeeze kale with your hands to expel liquid and transfer to center of a tea towel, bring up edges, and squeeze to expel remaining liquid.  Transfer kale to a food processor and pulse until finely chopped. Place kale in a large bowl along with drained ricotta, 1 tsp. salt, 8 tbsp. butter, flour, nutmeg, egg yolks, and egg. Season with pepper and mix until smooth. (Test 1 dumpling: Bring a small pot of water to a boil. Measure out 1 tbsp. of mixture, roll in flour, and boil until the dumpling floats. If dumpling falls apart, stir 1/4 cup more flour into mixture.)

Grab a large spoonful of the mixture (1 - 1 1/2 tablespoons of mix) and using two spoons shape portion into an oval and roll in flour on a plate. Transfer dumplings to a lightly floured baking sheet and repeat with remaining portions. (If not cooking immediately, cover and freeze malfatti for up to 6 months.)

Bring a large pot of salted water to a boil and add dumplings; cook until dumplings float, 1–2 minutes. Using a slotted spoon, transfer dumplings to a baking sheet. Meanwhile, heat remaining butter in a 10" skillet over medium-high heat, stirring occasionally, until lightly browned, about 5 minutes. Add sage and cook until leaves are crisp, 1 minute. Divide dumplings between 4-6 serving plates, drizzle with sage butter, and garnish with more Parmesan and nutmeg, if you like.

SERVES 4–6

This recipe shared on:
The 21st Century Housewife - The Hearth and Soul Blog Hop
Foodie Friends Friday
My Turn For Us - Freedom Fridays

Tuesday, October 30, 2012

Bourbon Butterscotch Bread Pudding


Bourbon Butterscotch Bread Pudding!  Yep, you heard me right!  Despite our warm California weather, it is fall and time for the comfort food that I think of when I think of fall.  I am in the mood for soups and stews and pumpkin breads and bread pudding!


This bread pudding is probably the best bread pudding I have ever had....it is certainly the best I have ever made!  The custard is fabulous and flavored with vanilla and bourbon and flecked with little poppy seeds!  On it's own, this bread pudding is not too sweet and has a fabulous flavor....but paired with the bourbon butterscotch sauce....ahhhh, to die for!!!


The great thing about this recipe is that you put the whole thing together hours (up to 24 hours) before you bake it.  All of that yummy goodness in the custard has time to really soak into the day old bread.  The other great thing is that the recipe makes more butterscotch sauce than you will need for the bread pudding, so you've got leftover sauce to pour on your ice cream or over your apple pie! :)


Perfect ending to my perfect fall dinner! Pour the delicious butterscotch sauce right over the top of a warm slice and enjoy!

Bourbon Butterscotch Bread Pudding adapted from Epicurious


Butterscotch sauce:
1 cup (packed) light brown sugar
1/2 cup light corn syrup
3 tablespoons unsalted butter
1/2 cup heavy cream
1 tablespoon bourbon

Bring brown sugar, corn syrup, and butter  to a boil in a medium saucepan over medium-high heat, whisking to dissolve sugar. Boil until mixture is syrupy and measures 1 1/3 cups, about 3 minutes. Remove from heat; add cream and bourbon, if desired, and stir until smooth. Let cool. DO AHEAD: Can be made 3 days ahead. Let cool completely, cover, and chill. Rewarm before serving.

Pudding:
1 pound day-old rustic white bread (such as ciabatta), cut into 1" cubes
1/2 cup (1 stick) unsalted butter, melted
2 tablespoons plus 1 1/2 cups sugar
5 large eggs
4 cups heavy cream
1 1/2 tablespoons poppy seeds
Pinch of kosher salt
3 tablespoons bourbon
1/2 vanilla bean, split lengthwise or vanilla paste
2 cups pecan pieces

Toss bread, melted butter, and 2 tablespoons sugar in a large bowl and set aside. Using an electric mixer, beat eggs and remaining 1 1/2 cups sugar in another large bowl until pale yellow and fluffy, about 3 minutes. Add cream, poppy seeds, and salt; beat to blend. Place bourbon in a small bowl; scrape in seeds from vanilla bean (reserve bean for another use). Whisk to distribute seeds, then add to egg mixture, whisking to blend well. Pour egg mixture over bread mixture in bowl. Add pecans and toss to coat well. Transfer mixture to a 13x9x2" glass or ceramic baking dish, spreading out in an even layer. Cover with plastic wrap and chill overnight.

Preheat oven to 325°F. Remove plastic wrap and bake until top is browned in spots and a tester inserted into center comes out clean, approximately 1 hour. Serve bread pudding with butterscotch sauce.

Recipe shared on:
My Turn For Us - Freedom Fridays
Chocolate, Chocolate and More Chocolate - Thursday's Treasure
The 21st Century Housewife - The Hearth and Soul Blog Hop
Foodie Friends Friday

Monday, October 29, 2012

Guest Post - Cupcake VS Cake: The Pinterest Showdown


The past few weeks have been busy for me with mid-terms at school, deadlines at work and several small catering jobs.  Needless to say....I am behind in my posts!!

Lucky for all of us I have a guest blogger today, the lovely Rachel Hurley who writes for a UK lifestyles blog called Appliances Online @ Home.  Her blog is filled with posts about the home....cooking, decorating, family, etc.  So many great articles to read!  I could see from reading some of Rachel's other guest posts that she shares my love/obsession with Pinterest!  I was delighted when she offered to write a guest post for me that combines so many of my favorite subjects into one post....cupcakes, cakes and Pinterest!!  

Without further ado.....Miss Rachel Hurley:

Cupcake VS Cake: The Pinterest Showdown

If you haven’t yet been acquainted with Pinterest, let me introduce you. This is a relatively new social media website that’s based around imagery – and a fantastic place for avid cooks. What Pinterest allows you to do is collect all your favourite recipes from around the web and store them neatly on “pin-boards”, which then become your online cookery books. 

There are some fantastic foodie photographers out there who offer a feast for the eyes as well as the taste buds. You simply can’t help but want to bake with their inspiration. 

Currently, Pinterest is helping me with a seemingly insignificant, yet troubling problem – cupcakes or a cake? Let the pin-boards decide. 

Cake 

There are some seriously talented people out there when it comes to baking. Some of the cakes pinned on Pinterest are absolute works of art. Whatever the special occasion and however experienced you are, there is a cake you can bake – and you can find some real inspiration on Pinterest. Even novice bakers can give a Victoria sandwich a jolly good go. 

Here are several of my favourite cakes listed on Pinterest:

Leopard Print Baby Shower Cake
http://pinterest.com/pin/173459023118573302/

With leopard print sponge this cake will make any baby shower a memorable occasion. It’s fabulous in design but so beautiful you don’t want to dig in! I’m sure we could all get over that though.

Beach Time Cake
http://pinterest.com/pin/181199584977312615/

The winter weather is setting in, so re-live summer with this fantastic beach cake. Turn up the thermostat, put on your bikini and pretend the sun’s still shining – and invite all your friends round to indulge.

Cupcakes

Cupcakes are the ideal pre-portioned food, so they’re great for buffets and parties where you don’t want to be leaving knives hanging around on tables. Plus, kids and adults alike love cupcakes, and they can be decorated in an array of different and innovative ways to set the tone for a delicate tea party, or a fun and frivolous children’s event. It’s now even quite popular to substitute a wedding cake with tiers of delicate and ornate cupcakes. 

Take a look at these beauties:

The Very Hungry Caterpillar
http://pinterest.com/pin/250231323015488100/

Perfect for kids’ parties and relatively simple to execute – even if you’re not the most skilled baker you could still give green iced cupcakes a good go.

Spooky Spiders
http://pinterest.com/pin/253609022737713602/

Ideal for Halloween, these spooky spider cakes are a cute addition to a themed party spread – or as a special treat for your little one’s lunch box. 

Who’s the winner?

There are a stunning range of cakes out there to help you celebrate any event – from a special birthday to a Tuesday afternoon. But in the cupcake versus cake debate I’m currently in the cake corner – I love the fact that there is a greater area to decorate, and digging in can like opening a Christmas present! What’s the filling under the frosting? You never know quite what’s inside. You might even find some leopard-print spots.  

Authors Biography 

This article was written by Rachel Hurley who writes for Appliances Online. When she isn’t trawling Pinterest for amazing baking creations she enjoys grabbing a glass of wine and relaxing on the couch. Follow her on Twitter @Rachel_Hurley23.

Monday, October 15, 2012

Hot Cocoa Cookies!


I'm just back from a short-but-sweet trip to one of my favorite places...Carmel!  I was in need of a quick de-compression from school, work, etc. and Carmel has everything I love....beaches, wineries, romance, shopping, great restaurants, and hiking!  Weekend over  :(   time to get back to work and prepare for my last two mid-terms....ugh!


Before I do, I had to share these fabulous cookies with you.....Hot Cocoa Cookies!!!  YUM!  This is a Rachel Ray recipe, and I don't know why she always says she doesn't much care for baking....when she created this fabulous recipe!


The cookies are a rich, chocolatey cookie that is baked until just done....


Then topped with half a large marshmallow into which a small chunk of chocolate has been stuck.  I chose to use milk chocolate because I had some hersheys bars in the house but you should feel free to use milk or dark chocolate.


Pop the cookies back in the oven for a few minutes, just until that marshmallow gets a little gooey and the chocolate melts.


After the cookies cool for just a few minutes, you can eat them and enjoy all that melty, gooey goodness!  The cookies were good later after they had cooled but according to my son Max, they are best RIGHT out of the oven!!  :)


I made these for a friend at school who was having a birthday and doesn't mind being my guinea pig for new recipes.  I had never made them before and was so happy to see that the recipe is perfect!  Happy Birthday to Julie and Yay me for finding another great recipe!!

 Hot Cocoa Cookies via Rachel Ray

1 stick (4 oz.) unsalted butter
12 ounces semisweet chocolate chips
1 1/2 cups flour
1/4 cup unsweetened cocoa powder
1 1/2 teaspoons baking powder
1/4 teaspoon salt
1 1/4 cups (packed) light brown sugar
3 eggs, at room temperature
1 1/2 teaspoons pure vanilla extract
30 large marshmallows
7-8 ounces milk chocolate or semi-sweet chocolate bars cut into 1 inch chunks
Semi-sweet chocolate bar to grate over the top of cookies

In a medium saucepan, melt the butter and chopped chocolate, stirring frequently, over medium heat. Let cool for 15 minutes.

In a medium bowl, whisk together the flour, cocoa powder, baking powder and salt.

Using an electric mixer, beat the sugar, eggs and vanilla at low speed until smooth, 2 minutes. Mix in the cooled chocolate mixture just until blended. Add the flour mixture in 2 batches, mixing on low speed until just combined. Refrigerate the dough for at least 1 hour. (If making the dough a day ahead, let sit at room temperature for 30 minutes before shaping.)

Position a rack in the upper third of the oven; preheat to 325 degrees . Line 2 large cookie sheets with parchment. Using a tablespoon, scoop the dough and roll between your palms to form 1-inch balls. Arrange about 16 balls 2 inches apart on each cookie sheet, flattening slightly. Bake until the tops of the cookies crack, about 12 minutes.

Meanwhile, snip marshmallows in half crosswise and stick 1 square of chocolate onto each of the cut sides.
Remove the cookie sheets from the oven; gently press a marshmallow half, chocolate side down, into each cookie. Bake until the marshmallows are just softened, about 4 minutes.

Transfer the pans to racks to cool for 5 minutes; grate the remaining chocolate over the hot cookies. Using a spatula, transfer the cookies to the racks; let cool. Repeat the process with the remaining dough, marshmallows and chocolate. Bake each batch on a clean sheet of parchment.

This recipe shared on:
Foodie Friends Friday
My Turn For Us Freedom Fridays
Chocolate, Chocolate and More Chocolate "Thursday's Treasures"
21st Century Housewife - Gallery of Favorites


Saturday, October 6, 2012

White Bean, Sausage and Kale Soup


One week ago we were having 100 degrees weather, air conditioners were on, the pool was full of people. Fast forward to today and we are at 70 degrees.  Chilly mornings and evenings, sunny days with gentle breeze.  Fall is here! The drastic change had me thinking about my favorite fall foods and craving apple pie, pumpkin bread and soup.  I love soup!

  
I've been drinking green smoothies with kale for the last couple of weeks and have a refrigerator full of kale, so I knew I wanted to do something that had kale in it.  Don't say "ewww"!  Kale is fabulous and so good for you!  It has very little flavor and basically takes up the flavor of whatever ingredients you cook it with.  In a smoothie it will taste like all of the yummy fruits you mix it with.  It tastes fabulous sauteed with garlic and prosciutto.  It is also perfect in soups. Sausage in the freezer, cans of white beans, fresh thyme out in the garden!  Sounds like the ingredients for a great soup to me!


This is a very easy soup with very few ingredients and it comes together in no time at all.  Feel free to experiment with it and add more vegetables, different beans, you could even use a different type of sausage.  The point is, this is a very good, easy, and healthy soup that will warm you up on a cold fall night!


See? I don't just sit around all day eating cupcakes!  I even like to eat the healthy stuff!  LOL  ;)

Enjoy!

White Bean, Sausage and Kale Soup

1 lb Italian Sausage (I used Italian chicken sausage), cooked and sliced
1 small onion, coarsely chopped
2 tablespoons olive oil
4 garlic cloves, finely chopped
6 cups chicken broth
2 cans white beans (such as great northern), drained and rinsed
1 piece parmesan rind
1 bay leaf (not California)
1 teaspoon fresh thyme
1 lb kale, stems and center ribs discarded and leaves coarsely chopped
salt and pepper, to taste
hot sauce, to taste

Cook onions in oil in an 8-quart pot over moderately low heat, stirring occasionally, until softened, 4 to 5 minutes. Add garlic and cook, stirring, 1 minute. Add cooked sausage, beans, broth, cheese rind, bay leaf, thyme, salt and pepper, and kale. Simmer, uncovered, about 30 minutes.  Check seasoning, add hot sauce to taste.

Recipe shared on: